


This tutorial will explain the basics of the Greenfoot interface, and interacting with Greenfoot.
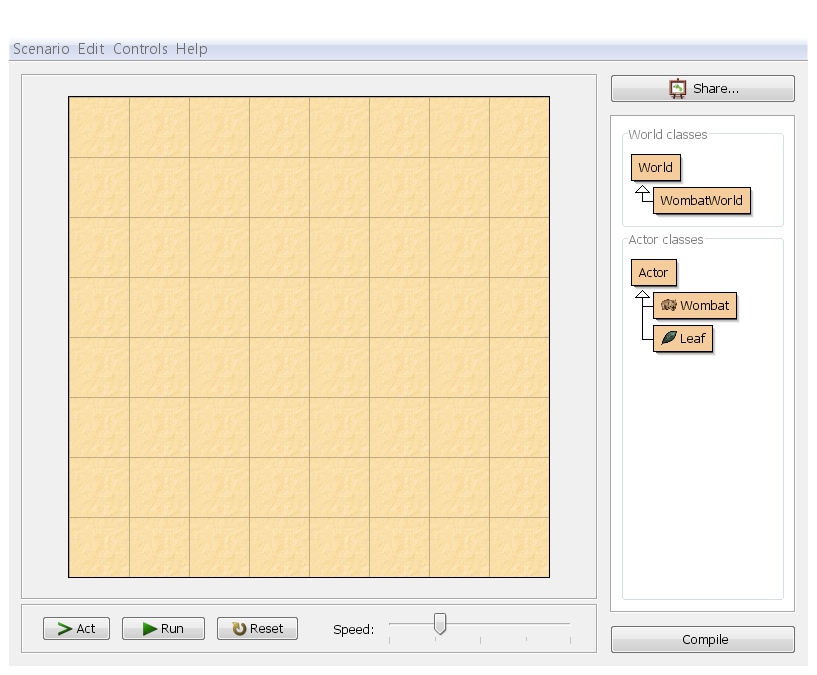
This tutorial uses a scenario called 'wombats' which you can download here (it is also included in the example scenarios with Greenfoot versions before 2.4.0). Open the wombats scenario in Greenfoot; you should then see this:
If you don't see the world, and the classes on the right have diagonal slashes over them, this is because the code is uncompiled. Click on the "Compile" button in the bottom-right.
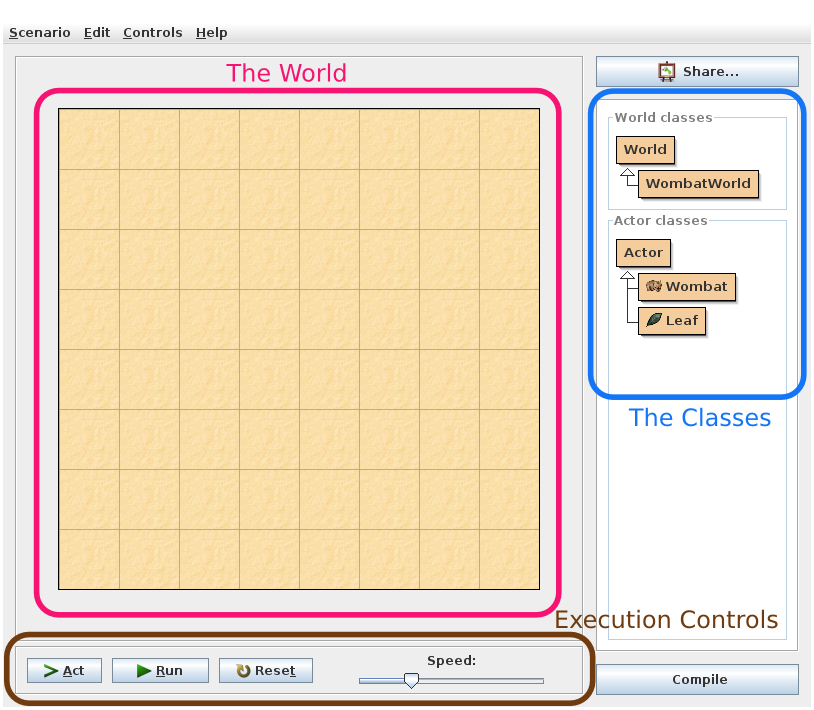
The large grid area that covers the majority of the window is called "the world". Since we have a scenario here that has to do with wombats, we see a wombat world. Towards the right side of the window is the class display . Here you can see all Java classes that are involved in the project. The classes "World" and "Actor" will always be there -- they come with the Greenfoot system. The other classes belong to the wombat scenario, and will be different if you use different scenarios.
Below the world are the Execution Controls (the area with the 'Act' and 'Run' buttons and the slider). Let's label all these things on our interface:
We will now place some objects into the world.
Right-click (on Mac, Control-click whenever this tutorial says right-click) the Wombat class in the class display. You
will see a pop-up menu like this:
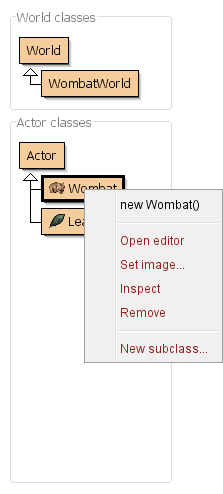
Choose 'new Wombat()' from the menu. Then click anywhere in the world. You
have just created a wombat (in Java terms: an object) and placed it into the
world.
Wombats eat leaves, so let's put some leaves into the world as well. Right-click the Leaf class, select 'new Leaf()' and place the leaf into the world.
There is a shortcut to place several objects a bit faster: shift-clicking into the world. Make sure the Leaf class is selected (left click on it in the classes panel, and it will get a thicker black border), then hold down the Shift key and left-click in the world several times. You will place one object of the selected class at every click. Much faster!
Click the 'Act' button in the execution controls. Each object now acts -- that is: each object does whatever it is programmed to do. In our example, leaves are programmed to do nothing, while wombats are programmed to move forward. Try placing two wombats into the world and press Act again. Both will move.
Wombats also like to eat leaves. If they happen to come across a leaf in their path, they will eat it. Try placing some leaves in front of the wombats, then click Act -- the wombats will move forward and eat the leaves.
Click the 'Run' button. This is equivalent to clicking the 'Act' button over and over again, very quickly. You will notice that the Run button changes to a 'Pause' button; Clicking Pause stops everything acting.
The slider next to the Act and Run buttons sets the speed. Click Run and then change the slider, and you'll see the difference.
Instead of just running the whole scenario, you can also invoke single methods. A method is a single action that an object can perform.
Make sure you have a wombat in the world, and the scenario is not running. Then right-click on the wombat (the one in the world, not the Wombat class), and you will see that objects in the world also have a pop-up menu:
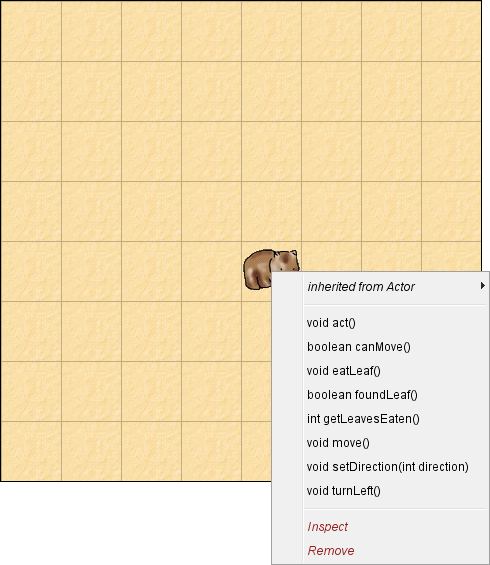
You can select any of the methods shown here to ask the wombat to do something. Try, for example, turnLeft(). Selecting this from the menu tells the wombat to turn to its left. Try move() as well.
Some methods give you an answer. getLeavesEaten(), for example, will tell you how many leaves this wombat has eaten so far. Try it. Then get the wombat to eat another leaf, and try calling that method again.
You will also notice a method called 'act()'. This method is called every time you click the Act button. If you want just one object to act instead of all the objects in the world, you can do this by invoking the object's act() method directly.
If you have many objects in the world that you do not want anymore, and you want to start all over, there is one easy option: throw away the world and create a new one. This is usually done by clicking the 'Reset' button in the execution controls. You will get a new, empty world. The old world is discarded (and with it all the objects that were in it) -- you can only have one world active at a time.
We have seen that objects in the world have methods which you can invoke via a pop-up menu. The world itself is also an object with methods that you can invoke. Right-click on any empty space in the world, or in the grey area immediately next to the world, and you will see the world's menu:
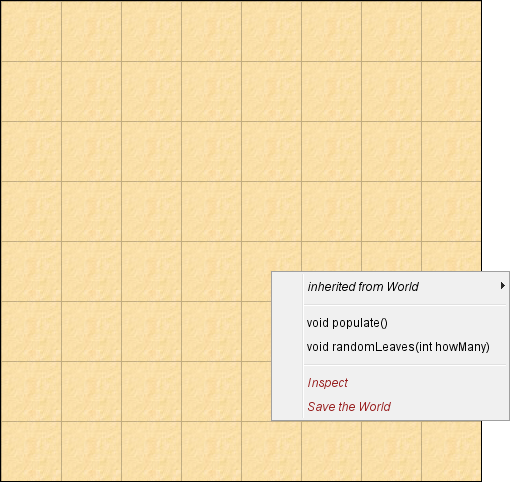
One of the methods in this menu is 'populate()'. Try it out. It is a method that creates several leaves and wombats and places them into the world. You can then run the scenario.
Another world method is 'randomLeaves(int howMany)'. This method places some leaves in the world at random locations. Note that this method has some words between the parenthesis after its name: 'int howMany'. This is called a 'parameter'. It means that you must specify some additional bit of information when you invoke this method. The term 'int' tells you that a whole number is expected, and the name 'howMany' suggests that you should specify how many leaves you want. Invoke this method. A dialogue will pop up that lets you enter a value for this parameter. Enter a number (say: 12) and click Ok.
(You may notice, if you count, that it sometimes appears as if fewer than the specified number of leaves were created. This is because some leaves may be at the same location, and are lying on top of each other.)
Okay, that's enough of wombats running around in circles endlessly -- let's move on to the really interesting stuff: programming! That's in part 2.